In this post, I will show you how to dial-in any SoftEther VPN server.
After this, you can connect to your Linode VPS from almost all Linux systems.
Preparation
- SoftEther VPN Source Code download link
Configuration
This post are tested in Gentoo Linux, it should also works for almost all Linux distributions.
Install SoftEther VPN
Same as introduced before, please follow the link.
Start the Client
Before configuring the client, we must start it as a daemon, it’s just a simple command:
vpnclient start
Manage the Client
Connect to the client via command line
Here, we using the vpncmd command line management utility to configure the VPN client:
linode-gentoo-01 ~ # vpncmd
vpncmd command - SoftEther VPN Command Line Management Utility
SoftEther VPN Command Line Management Utility (vpncmd command)
Version 4.24 Build 9652   (English)
Compiled 2017/12/21 10:34:43 by yagi at pc33
Copyright (c) SoftEther VPN Project. All Rights Reserved.

By using vpncmd program, the following can be achieved.

1. Management of VPN Server or VPN Bridge
2. Management of VPN Client
3. Use of VPN Tools (certificate creation and Network Traffic Speed Test Tool)

Select 1, 2 or 3: 2↵

Specify the host name or IP address of the computer that the destination VPN Client is operating on.
If nothing is input and Enter is pressed, connection will be made to localhost (this computer).
Hostname of IP Address of Destination: ↵

Connected to VPN Client "localhost".

VPN Client>
Create a NIC (virtual network adapter)
We will create a adapter named “fulong”.
VPN Client>NicCreate↵
NicCreate command - Create New Virtual Network Adapter
Virtual Network Adapter Name: fulong↵

The command completed successfully.

VPN Client>
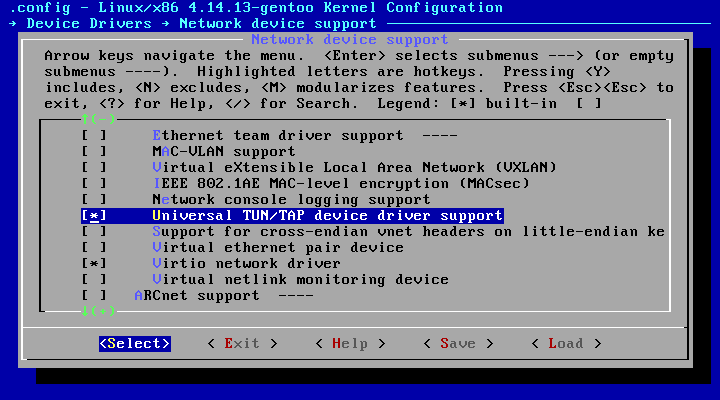
If it reported an issue, please check have you enabled TUN in your kernel configuration:
Create a account (VPN connection)
Except the NIC, you also need to special which user uses to connect which VPN server’s which hub, now let’s create a account.
Suppose your VPN Server IP address is 203.0.113.1, please replace it with your real IP address.
VPN Client>AccountCreate↵
AccountCreate command - Create New VPN Connection Setting
Name of VPN Connection Setting: fulong↵

Destination VPN Server Host Name and Port Number: 203.0.113.1↵

Destination Virtual Hub Name: Fulong↵

Connecting User Name: fulong↵

Used Virtual Network Adapter Name: fulong↵

The command completed successfully.

VPN Client>AccountPasswordSet↵
AccountPasswordSet command - Set User Authentication Type of VPN Connection Setting to Password Authentication
Name of VPN Connection Setting: fulong↵

Please enter the password. To cancel press the Ctrl+D key.

Password: ******↵
Confirm input: ******↵


Specify standard or radius: standard↵

The command completed successfully.

VPN Client>
Connecting to Server
Now, let’s connect to the VPN server, and check if it connected successful:
VPN Client>AccountConnect↵
AccountConnect command - Start Connection to VPN Server using VPN Connection Setting
Name of VPN Connection Setting: fulong↵

The command completed successfully.

VPN Client>AccountStatusGet↵
AccountStatusGet command - Get Current VPN Connection Setting Status
Name of VPN Connection Setting: fulong↵

Item                                      |Value
------------------------------------------+-------------------------------------------
VPN Connection Setting Name               |fulong
Session Status                            |Connection Completed (Session Established)
VLAN ID                                   |-
Server Name                               |203.0.113.1
Port Number                               |TCP Port 443
Server Product Name                       |SoftEther VPN Server (64 bit) (Open Source)
Server Version                            |4.24
Server Build                              |Build 9652
Connection Started at                     |2018-01-13 (Sat) 21:43:53
First Session has been Established since  |2018-01-13 (Sat) 21:43:53
Current Session has been Established since|2018-01-13 (Sat) 21:43:53
Number of Established Sessions            |1 Times
Half Duplex TCP Connection Mode           |No (Full Duplex Mode)
VoIP / QoS Function                       |Enabled
Number of TCP Connections                 |2
Maximum Number of TCP Connections         |2
Encryption                                |Enabled (Algorithm: AES128-SHA)
Use of Compression                        |No (No Compression)
Physical Underlay Protocol                |Standard TCP/IP (IPv4)
UDP Acceleration is Supported             |Yes
UDP Acceleration is Active                |Yes
Session Name                              |SID-FULONG-1
Connection Name                           |CID-1
Session Key (160 bit)                     |DA19A518947FB209A37EFF0566B35FAEAFF7A2C9
Bridge / Router Mode                      |Yes
Monitoring Mode                           |No
Outgoing Data Size                        |8,870 bytes
Incoming Data Size                        |1,607 bytes
Outgoing Unicast Packets                  |3 packets
Outgoing Unicast Total Size               |242 bytes
Outgoing Broadcast Packets                |27 packets
Outgoing Broadcast Total Size             |7,606 bytes
Incoming Unicast Packets                  |2 packets
Incoming Unicast Total Size               |172 bytes
Incoming Broadcast Packets                |0 packets
Incoming Broadcast Total Size             |0 bytes
The command completed successfully.

VPN Client>
If you can see these text above, congratulations, you are already connected to the server.
Set automatically connect
One more thing, set the connecting automatic connect when the client daemon start.
VPN Client>AccountStartupSet↵
AccountStartupSet command - Set VPN Connection Setting as Startup Connection
Name of VPN Connection Setting: fulong↵

The command completed successfully.

VPN Client>
Now, you have settled up a VPN connection to your VPN server on your Linux, and it will automatically connect when the VPN client daemon start.
What’s Next?
Next, you can setting up an layer 2 network with your Linode VPS, or using your VPN server as a gateway to explore the Internet.
Leave a Reply